In this article, I will guide you on how to install VPSSIM to manage your VPS/Server:
VPSSIM supports the AlmaLinux, CentOS Stream, RockyLinux, and Oracle Linux operating systems, versions 8 and 9, on servers using Intel/AMD/ARM CPUs, allowing you to choose the operating system that best suits your needs.
When setting up a server with VPSSIM, you can choose the following versions:
PHP: The minimum version is PHP 7.2, depending on the operating system version you select. For example, with RHEL 9 (like AlmaLinux 9), PHP is available from version 7.4. With RHEL 8 (like AlmaLinux 8), PHP starts from version 7.2. After completing the server installation, if you want to change to another PHP version, use the "Change PHP Version" feature in VPSSIM.
Nginx: There are three Nginx versions available: Nginx Mainline, Nginx Stable, and Nginx-more.
Nginx Mainline and Nginx Stable are installed directly from the Nginx.org repository, ensuring they are always the latest versions.
Nginx-more is a stable Nginx version with additional modules pre-installed, including Brotli, More Headers, Cache Purge, VTS, GeoIP2, Echo, and ModSecurity, making it easier to use these modules. View more about Nginx-More here
VPSSIM version 6.0.0 and later supports configuring the Nginx ModSecurity module, a highly recommended module for protecting servers and websites. This feature only works with Nginx-more, so I recommend choosing Nginx-more when setting up your server.
However, if you select Nginx Stable or Mainline, you can still switch to Nginx-more later using VPSSIM's Change/Update Nginx feature to select your preferred Nginx version.
Currently, I am also using Nginx-more with the GeoIP2 module on the servers running vpssim.com and vpssim.net. I use this module to redirect traffic from vpssim.net to vpssim.com for visitors from Vietnam. You can observe this behavior by visiting vpssim.net.
Preparing the Server:
- A VPS (Server) running AlmaLinux, CentOS, RockyLinux, or Oracle Linux, version 8 or 9. While VPSSIM still supports CentOS Stream, I do not recommend using it for general users. For more details, see: Why You Shouldn’t Use CentOS Stream and Should Choose AlmaLinux, Rocky Linux, or Oracle Linux.
- PUTTY software for connecting to your VPS via SSH if you're using Windows. On Linux/Mac, you can use the built-in Terminal. Simply log in to your server via SSH and copy the command from VPSSIM.Net to start the installation.
- VPSSIM includes an automatic swap creation feature. Therefore, after installing VPSSIM, you can quickly and easily create a swap without needing to set it up beforehand.
Connecting to the VPS via SSH
You must use the root account. VPSSIM does not work with regular users.
Windows users: Refer to this guide: How to Connect to a VPS via SSH Using PuTTY on Windows
MacOS users: Follow this guide: How to Connect to a VPS via SSH Using Terminal on macOS
Linux users (Ubuntu, AlmaLinux, etc.): See this guide: How to Connect to a VPS via SSH Using Terminal on Linux (CentOS, Ubuntu, Linux Mint...)
Command to setup VPSSIM:
You can choose one of the two commands to install, depending on the language you want to use::
English Version :
curl https://get.vpssim.net -o install && sh install
Vietnamese Version (Tiếng Việt):
curl https://get.vpssim.com -o install && sh install
After running the command, VPSSIM will automatically download and start the installation process, with step-by-step instructions displayed on the screen. Simply follow these steps to complete the installation and efficiently manage your VPS. Once the installation is complete, use the command: vpssim to start VPSSIM.
The installation speed depends on how long it takes to update the operating system on your server. If you run dnf update before installing VPSSIM, the installation will only take a few minutes; otherwise, it may take longer. Therefore, please be patient and wait for the process to complete.
Setup VPSSIM:
After logging in to the VPS via SSH with the root account, run the command:
curl https://get.vpssim.net -o install && sh install
Next, VPSSIM will ask you to confirm disabling SELinux. Simply press Enter to allow VPSSIM to automatically perform this process. After SELinux is disabled, your VPS will need to reboot for the changes to take effect.
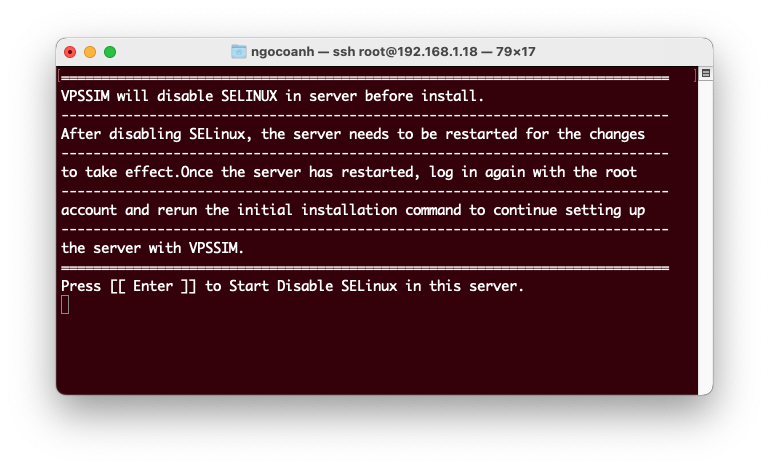
After the VPS reboots, run the VPSSIM installation command again, just as you did before. Then, VPSSIM will continue installing the necessary files before downloading the files required to run VPSSIM and proceeding with the installation.
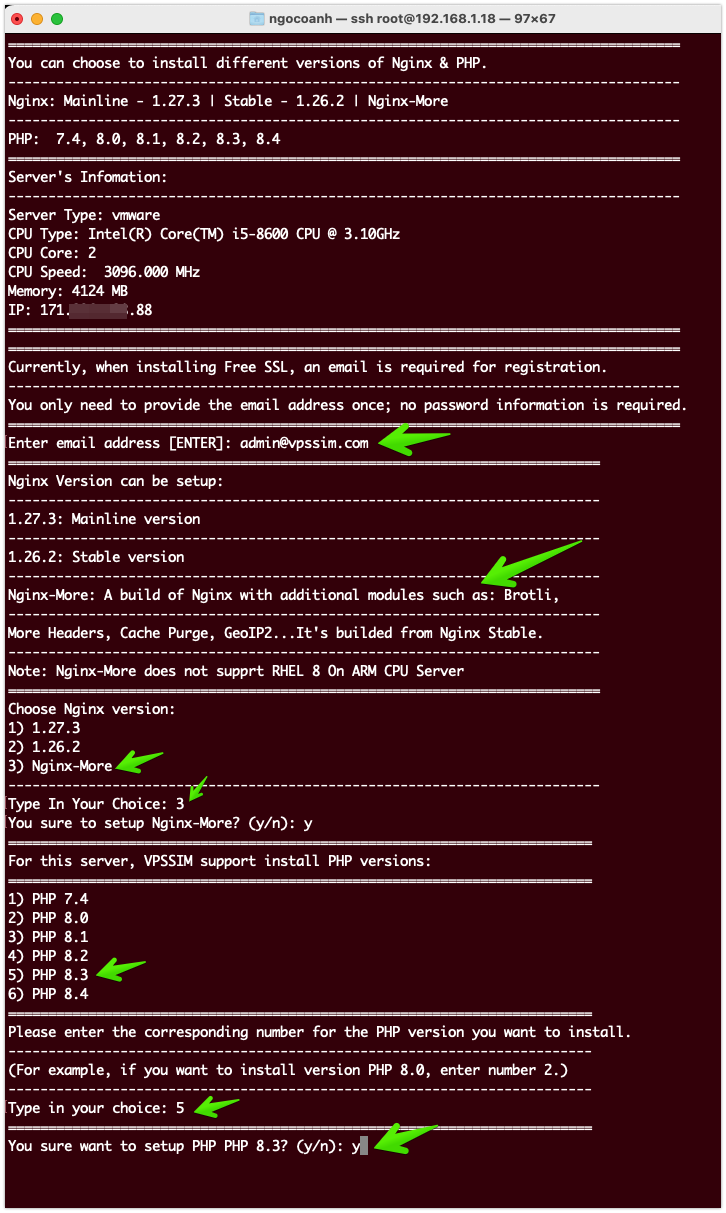
At this step, you need to choose the versions of Nginx and PHP.
For PHP, you can choose according to your needs, but for Nginx, I recommend selecting Nginx-more to fully utilize all the features of VPSSIM, including the Nginx ModSecurity configuration.
After making your selections, you will need to confirm in order for the installation process to officially begin.
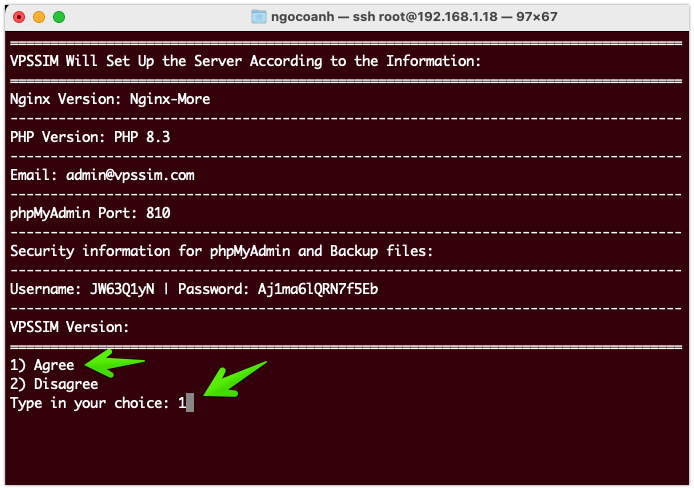
When the installation process is complete, VPSSIM will display basic information such as the management link, username, and password to access this link:
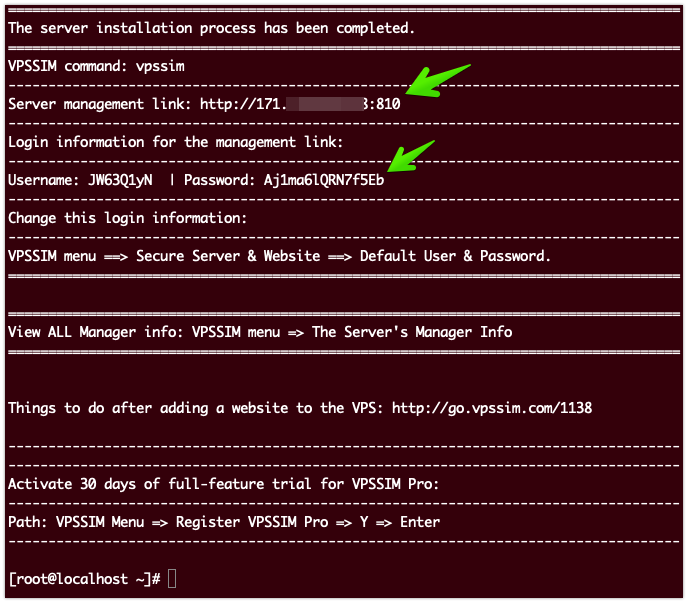
Now, you can use the command vpssim to launch VPSSIM.
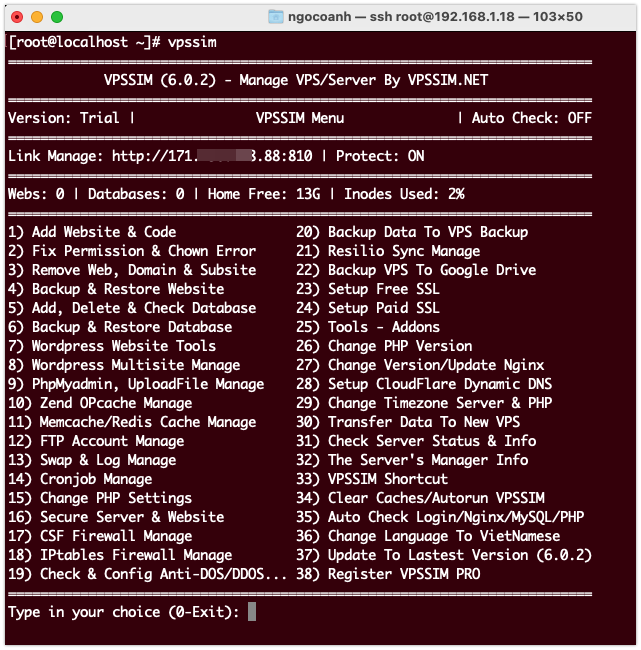
You can access function number 32 - Server Management Information to view the management details.
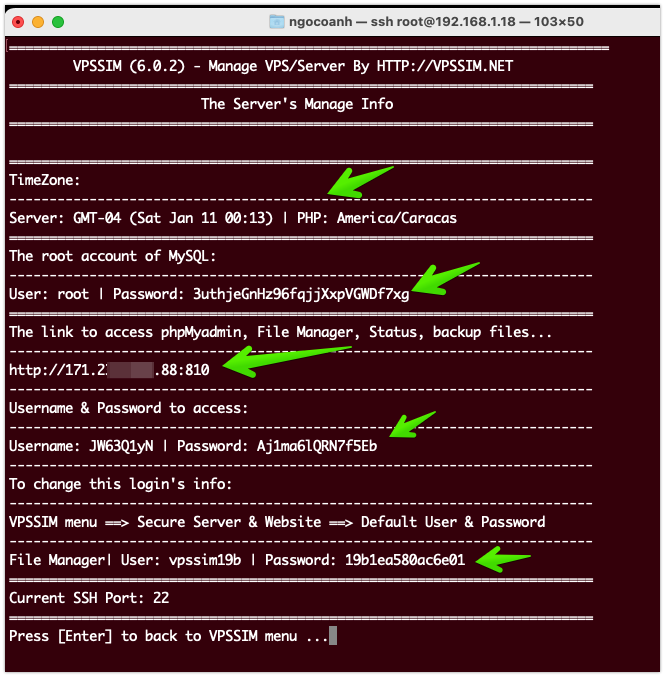
Access the management link at: http://vps_ip:810, and use the username and password provided in the Server Management Information section to log in.
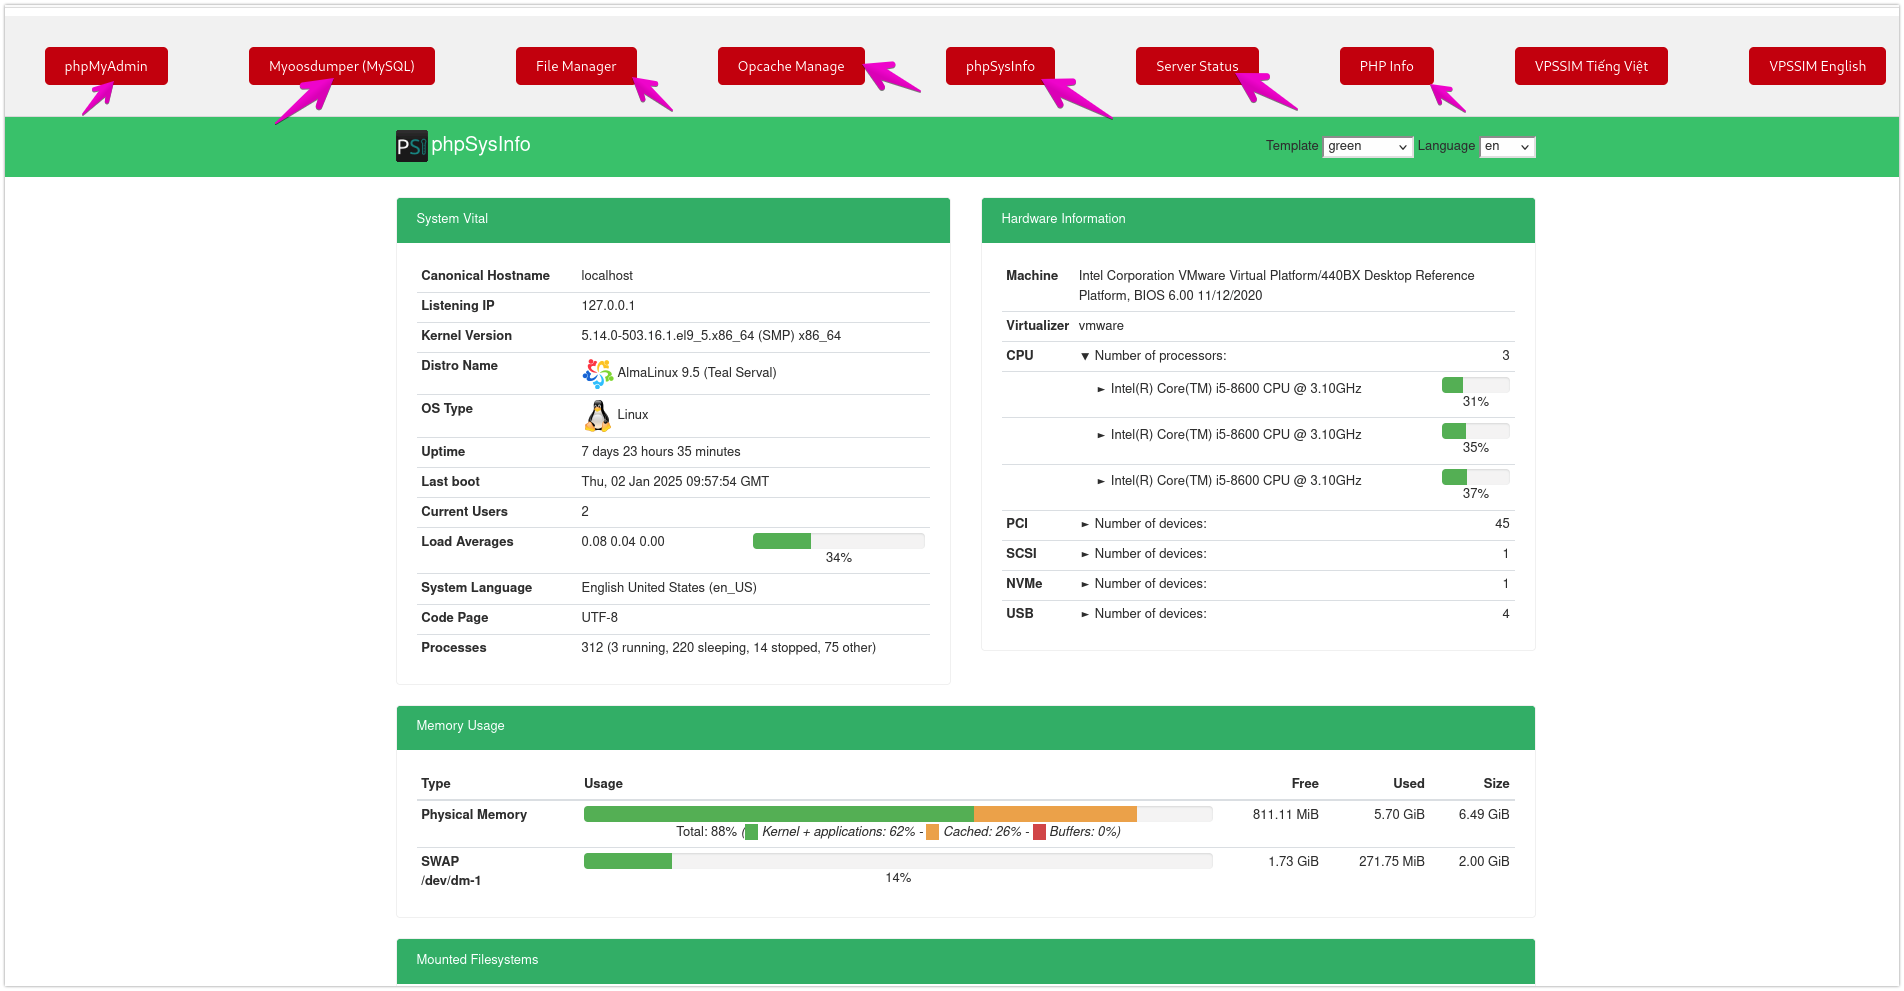
At the management link, you can access:
• phpMyAdmin
• My00sdumper
• File Manager (using the login details from the Server Management Information)
• Opcache Manage (used to clear PHP cache whenever you edit a PHP file)
• phpSysinfo (the default page displayed is this)
• Server Status (similar to phpSysinfo)
• PHP Info
That’s it! I’ve completed the guide on installing VPSSIM for VPS/Server. Thank you!